Contact Verification
PrimeRole offers robust contact verification features to ensure the accuracy and deliverability of your outreach efforts. This page details the email and phone verification processes and how to connect with verification providers.
Understanding Contact Verification
PrimeRole provides different methods and statuses for verifying contact information. This section covers email and phone verification processes and how to manage verification providers.
Email Verification
PrimeRole provides multiple ways to verify email addresses: on-demand and automatic.
On-Demand Email Verification
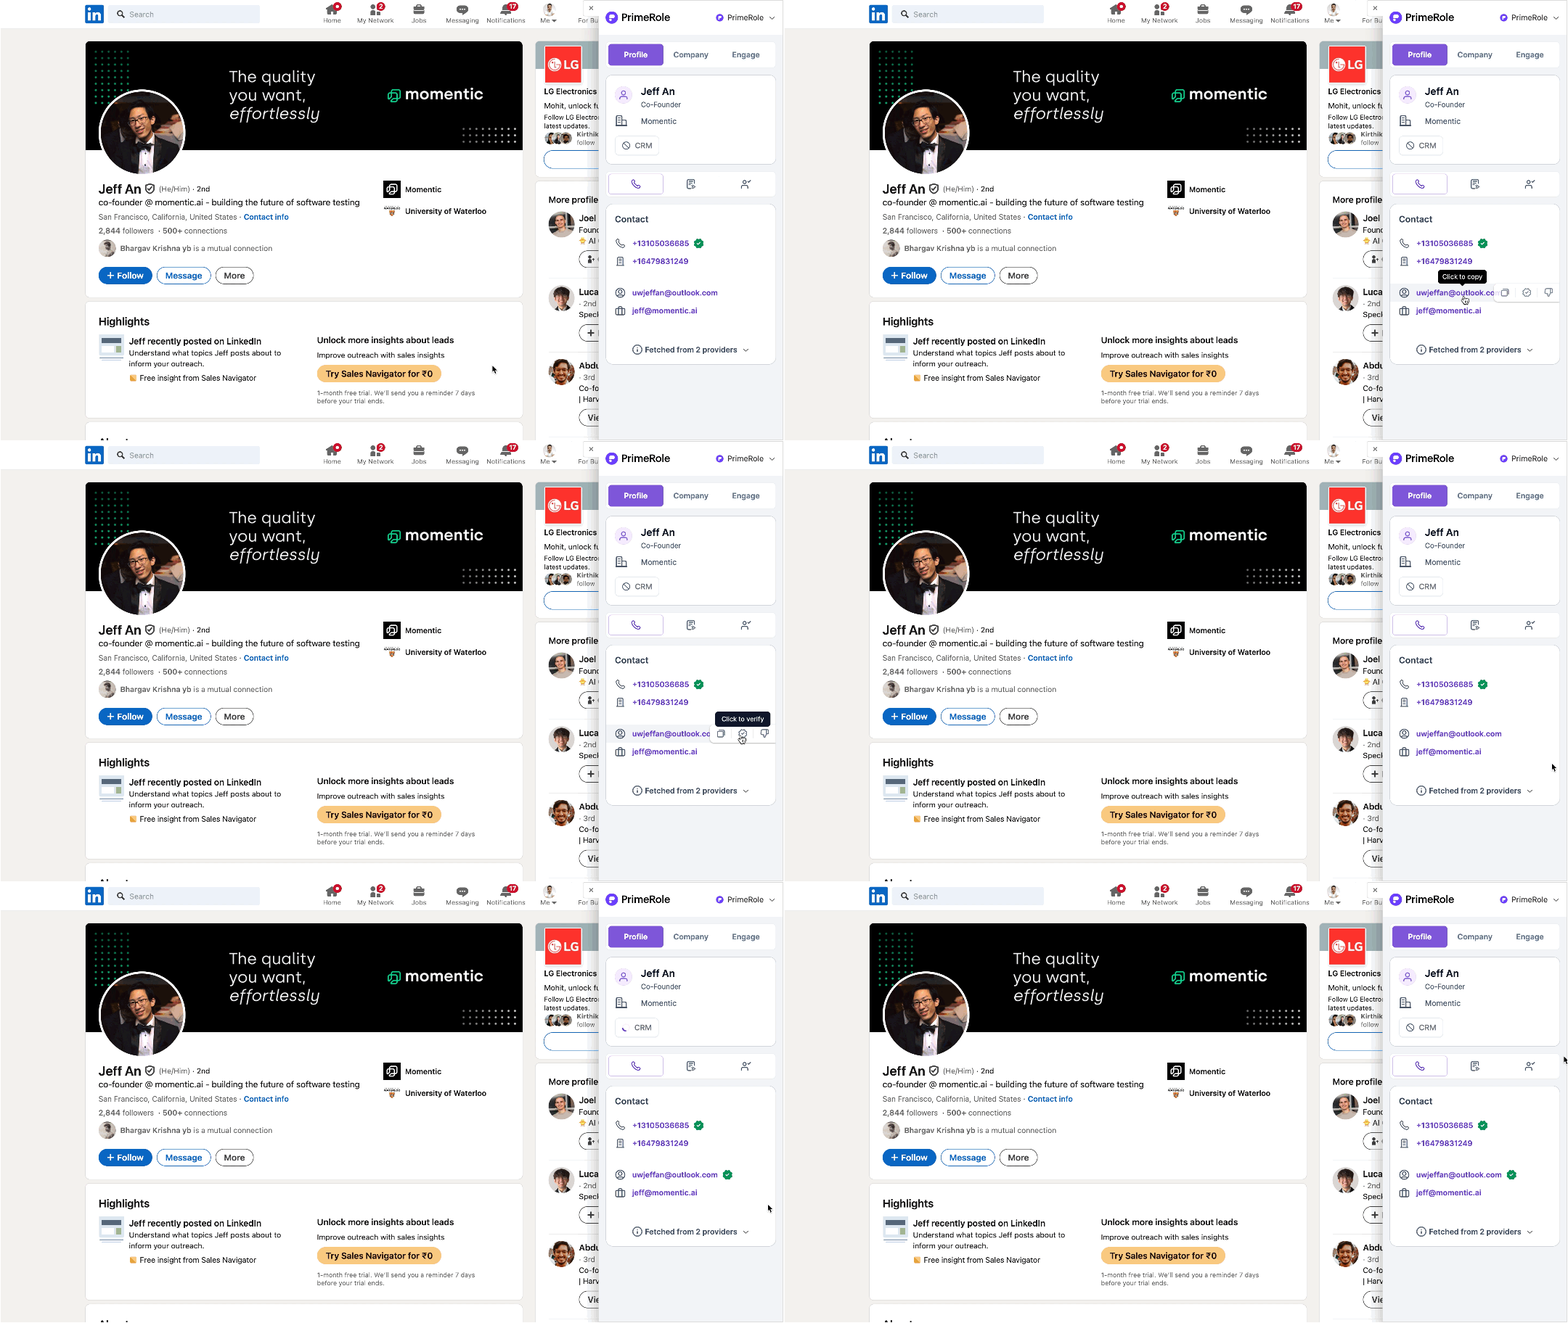
You can verify an email address directly when viewing it in the PrimeRole extension:

- Reveal the Email Address: Use the PrimeRole extension on a LinkedIn profile to reveal the contact's email address.
- Hover to Verify: Hover your mouse cursor over the revealed email address.
- Click "Verify Email"
: An option to "Verify Email" will appear. Click it to initiate the verification process.
Automatic Email Verification
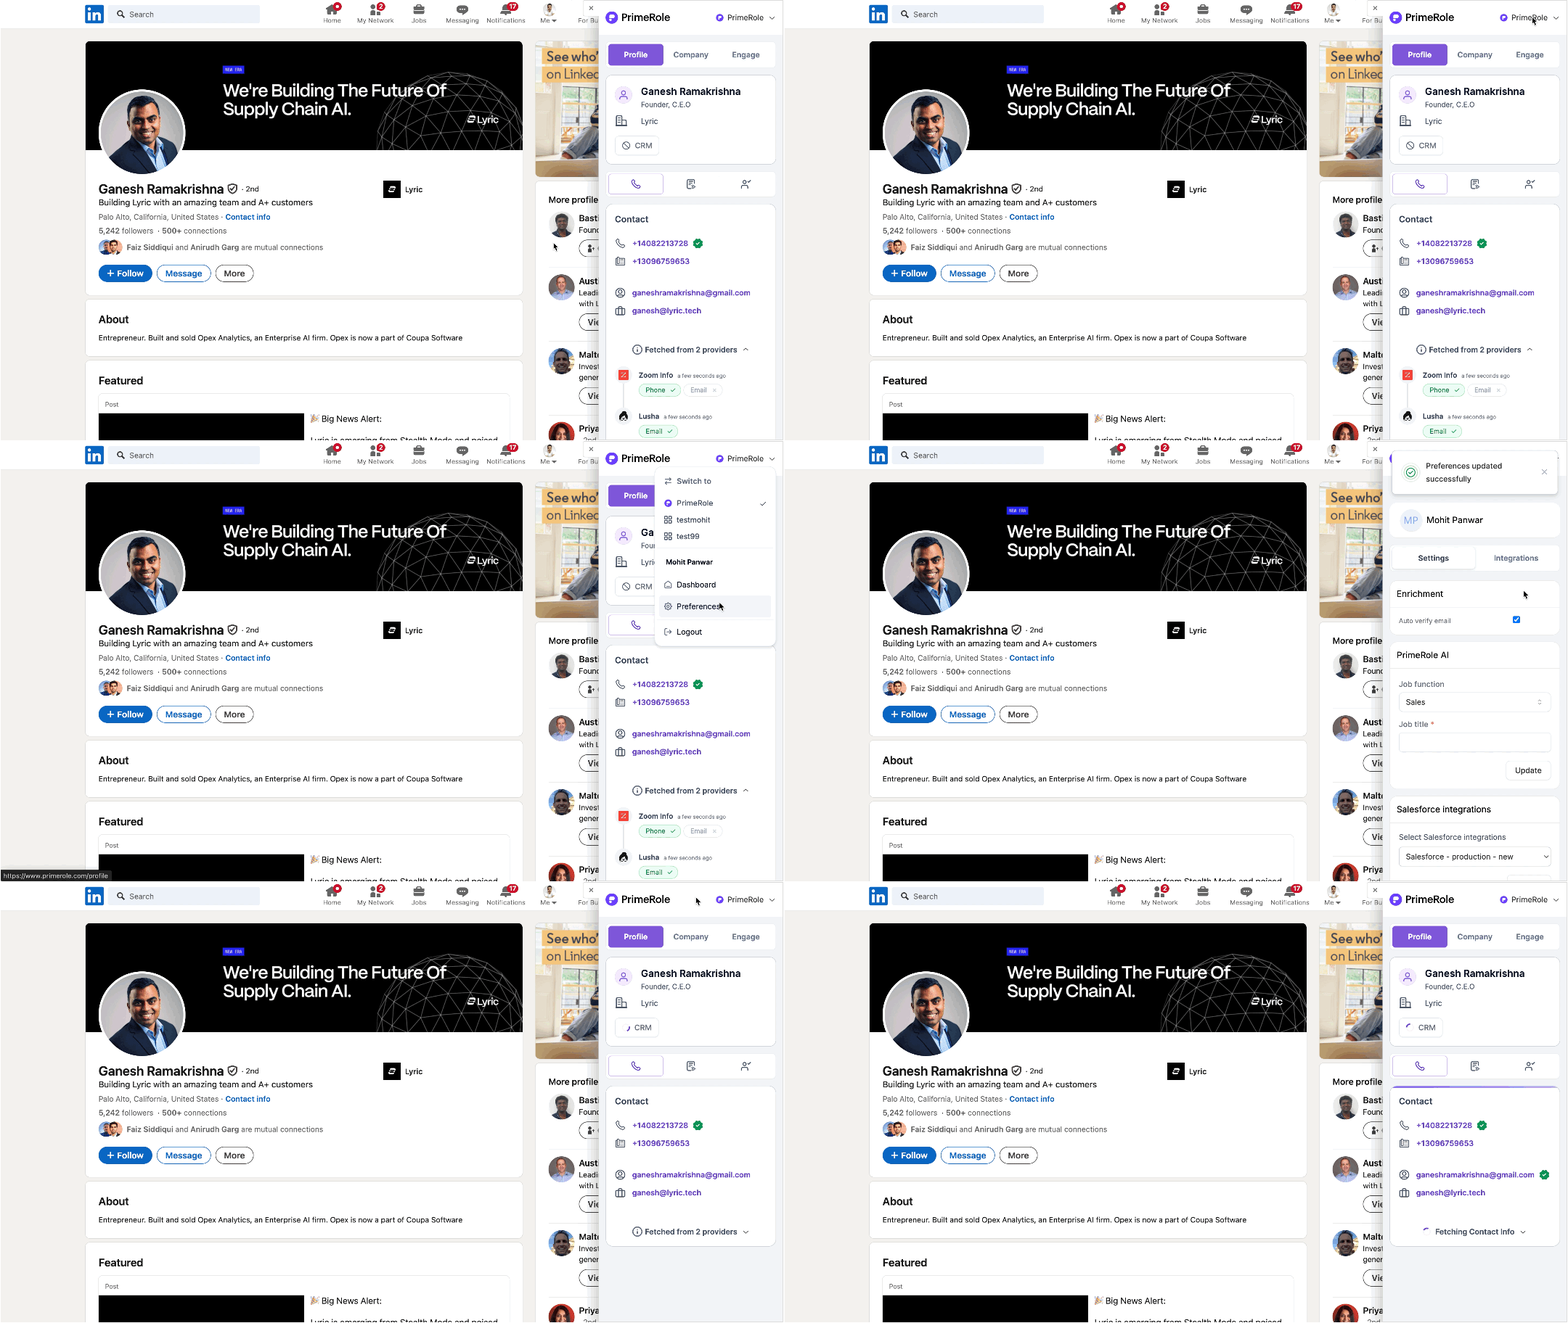
You can also configure PrimeRole to automatically verify emails during the enrichment process:

- Open PrimeRole Extension Preferences: Click on the PrimeRole extension icon in your browser's toolbar.
- Go to Preferences: Click on the gear icon (Settings) or the "Preferences" option in the extension's menu.
- Navigate to Enrichment: Find and click on the "Enrichment" section in the Preferences menu.
- Enable Auto Verify Email: Locate the "Auto Verify Email" setting and toggle it to the "On" position.
With auto-verification enabled, PrimeRole will automatically verify email addresses whenever you enrich contact details.
Understanding Email Status
After verification (either on-demand or automatic), PrimeRole provides detailed email status information:
| Signal | Status | Description |
|---|---|---|
 | Verify | Email is in verification process |
 | Verified | Email has been verified successfully |
 | Soft Bounce | Temporary delivery failure possible |
 | Hard Bounce | Permanent delivery failure |
 | Catch all | Domain accepts all email variations |
 | Disposable | Temporary or disposable email address |
 | Role based | Generic role email (e.g., info@, support@) |
 | Risky | Email might be problematic for sending |
 | Free/Personal | Free email provider or personal address |
 | Invalid | Email address is not valid |
 | Unknown | Verification status cannot be determined |
Accessing Email Status (After Verification):
Email status is displayed:
- Within the PrimeRole extension when viewing a contact's profile on LinkedIn.
- Within the PrimeRole platform after enriching contact details.
Phone Verification
PrimeRole also verifies phone numbers to ensure they are active and reachable. While specific details about phone verification status may vary depending on the data provider, the goal is to identify valid and active phone numbers.
Understanding Email Status
| Signal | Status | Description |
|---|---|---|
 | Verified | Phone No. has been verified successfully |
 | Line type mismatch | This line type is mismatched |
 | Invalid | Mobile No. is not valid |
Accessing Phone Verification:
Similar to email status, phone verification information is usually displayed within the PrimeRole extension or platform after enriching contact details.
Connecting with Email Verification Providers
PrimeRole integrates with various email verification providers to enhance data accuracy. You can connect with these providers to leverage their verification services.
Connecting to an Email Verification Provider:

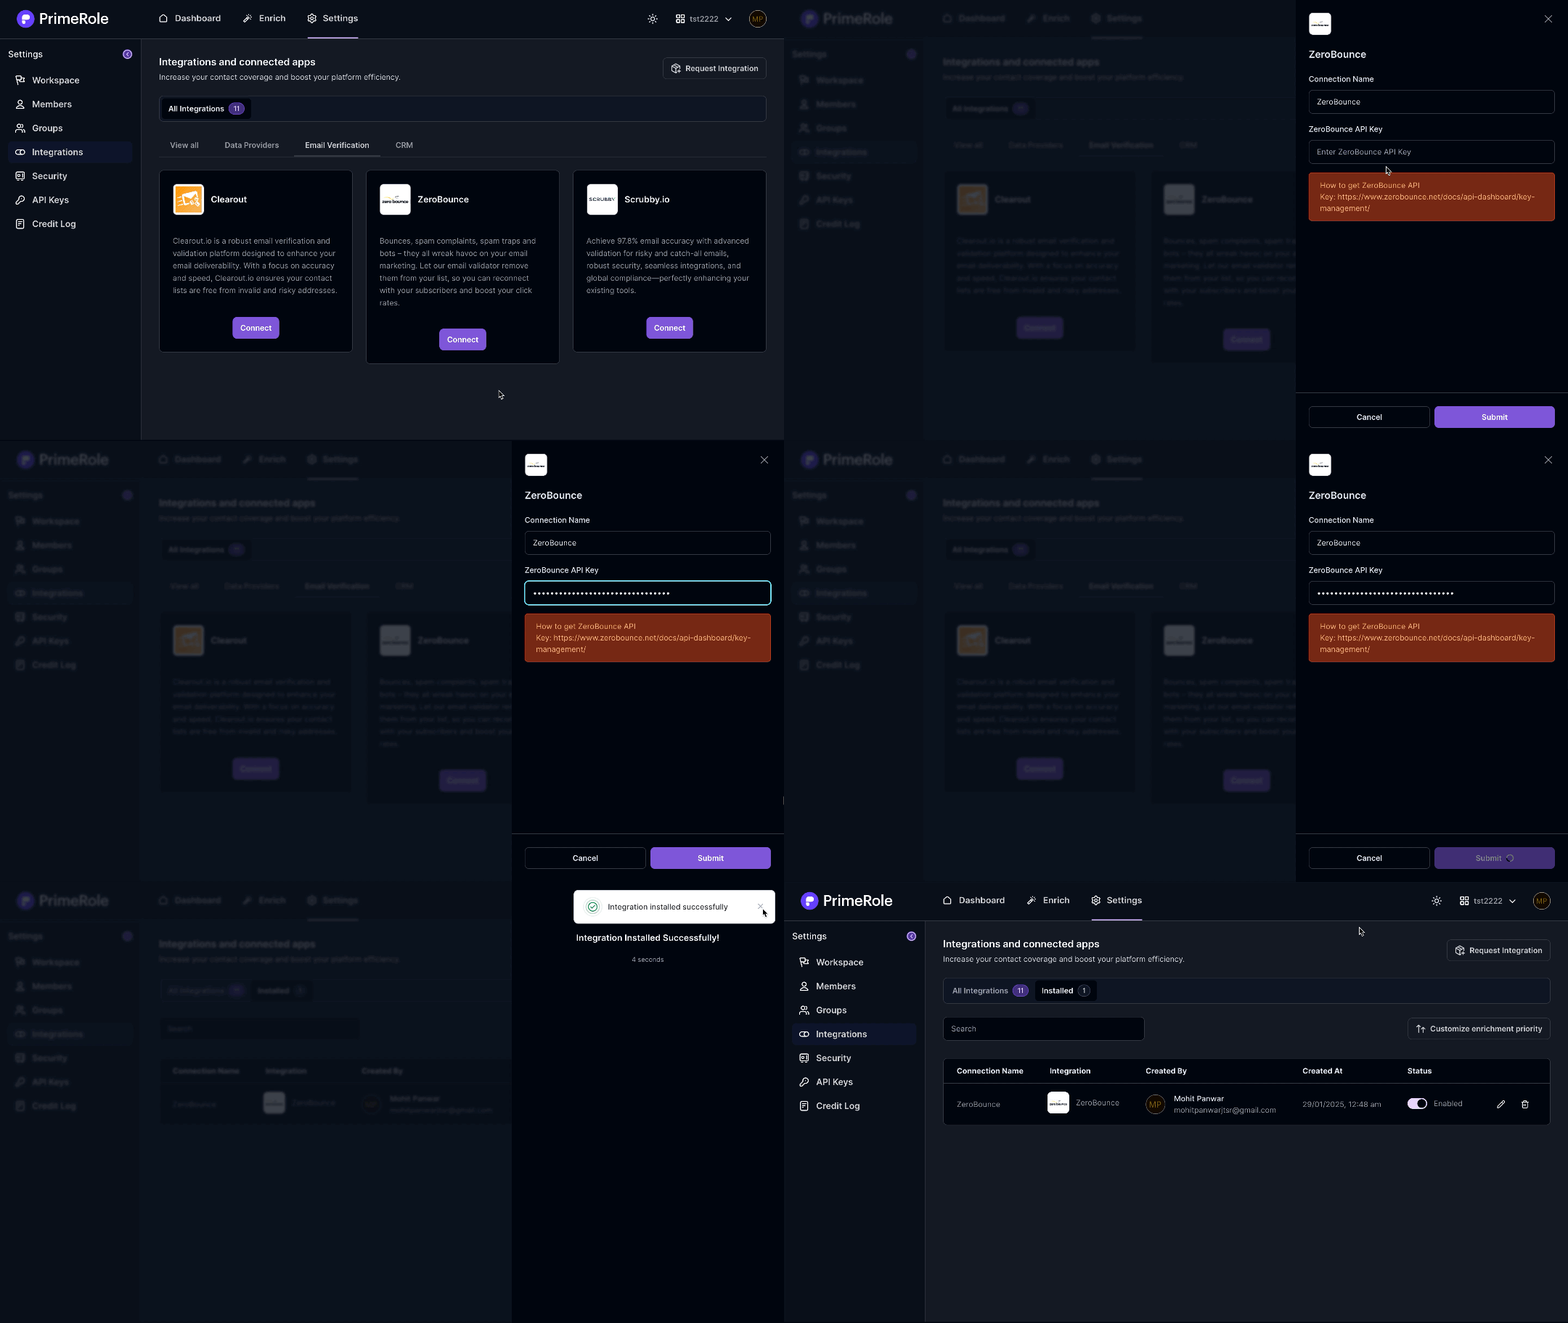
- Go to PrimeRole Platform: Open the PrimeRole platform in your web browser.
- Go to Settings: Click on "Settings" in the main navigation bar.
- Go to Integrations: Select "Integrations" from the left sidebar menu.
- Go to All Integrations: Ensure you are on the "All Integrations" tab.
- Find Email Verification Provider: Locate the email verification provider you wish to connect with.
- Click "Connect": Click the "Connect" button next to the provider.
- Enter API Keys (If Required): Enter any required API keys or credentials provided by the verification service.
- Submit the Connection: Click the "Submit" or "Save" button to establish the connection.
Managing Email Verification Providers:
After connecting with an email verification provider, you can manage the connection in the "Installed Integrations" section of the Integrations settings. You can enable/disable, remove, or reconfigure the provider as needed.
By utilizing PrimeRole's contact verification features and connecting with email verification providers, you can significantly improve the quality of your contact data and enhance the effectiveness of your outreach campaigns.